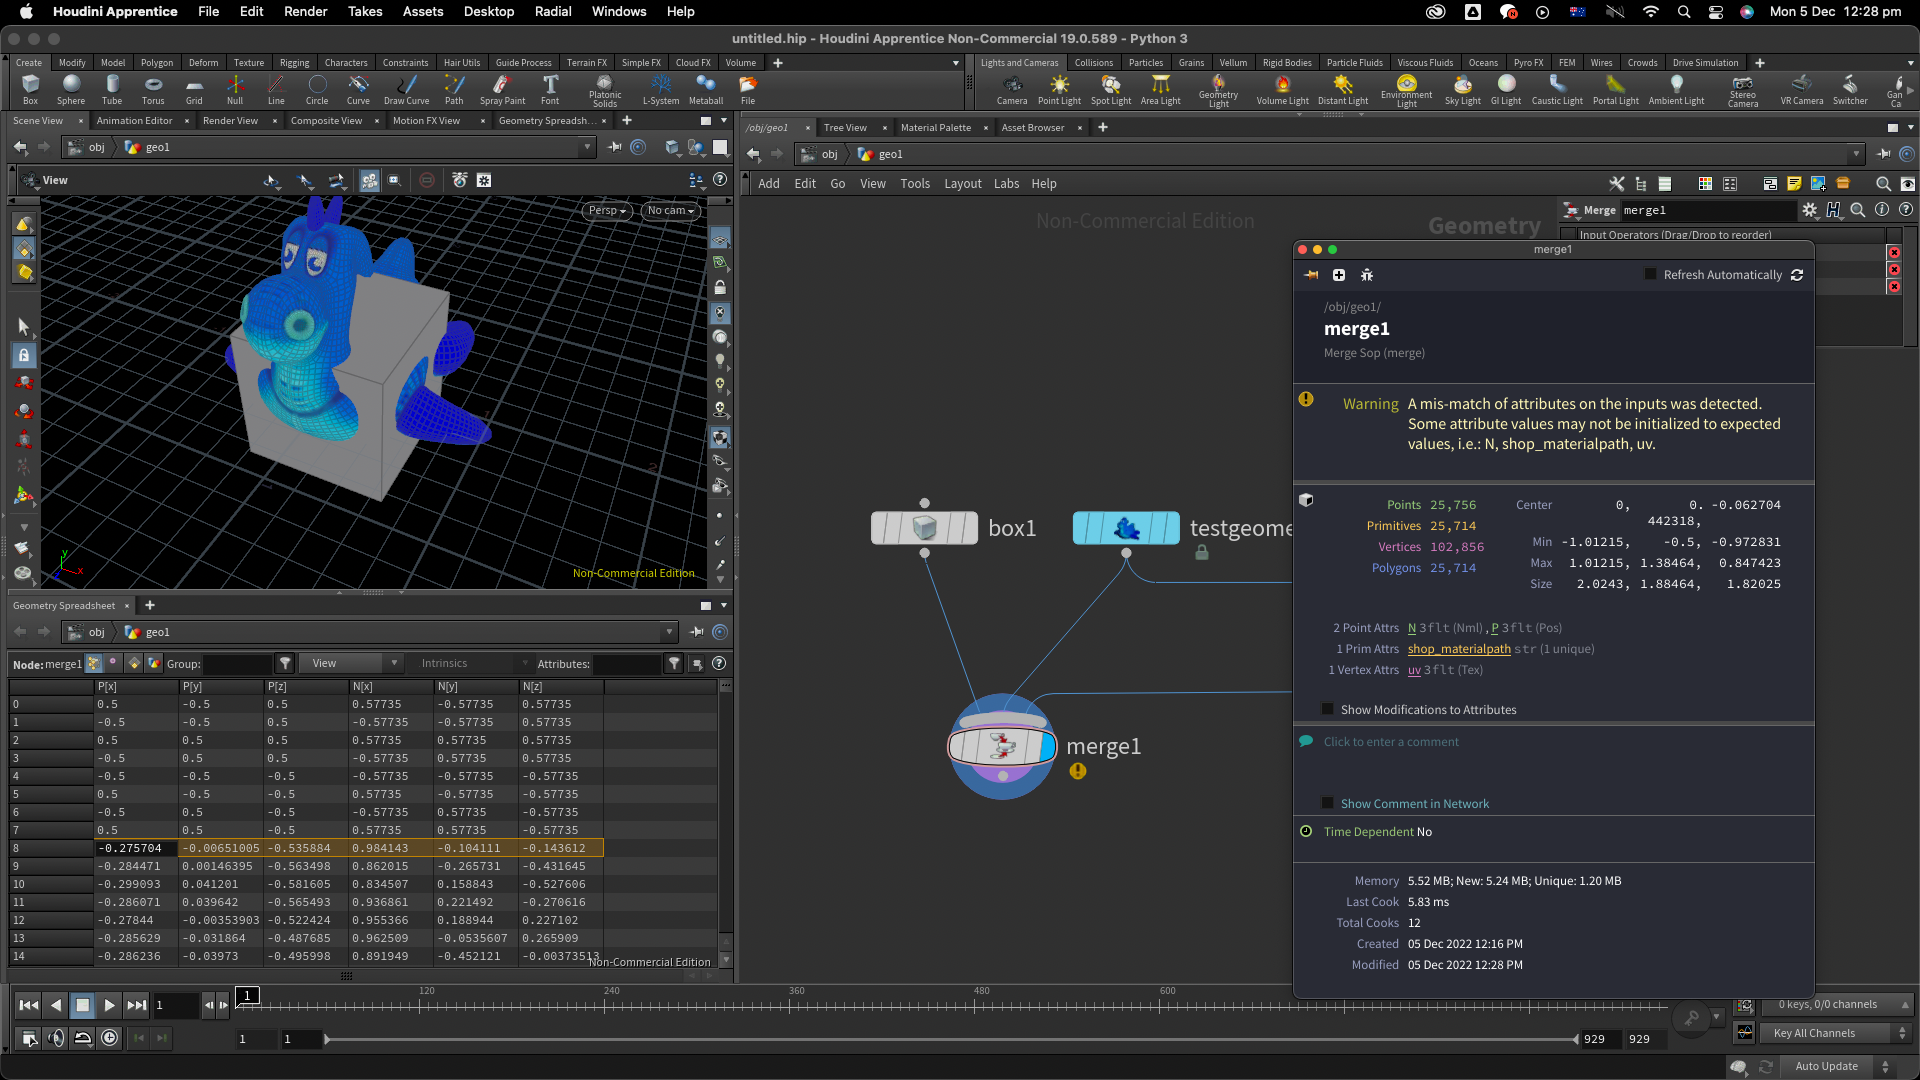
이번 시간에는 본격적인 Houdini 1에 들어가기 앞서 기존에 배워왔던 기본적이고 핵심적인 내용들을 가볍게 훑어보는 시간을 가졌다. 지금까지 최초 입문 강의와 Joy of Vex 강의를 통해 배워왔던 부분들 중에서 merge node로 각기 다른 두 Object들을 묶었을 때에 경고등이 표시되는 것을 볼 수 있었을 것이다. 이는 각각의 Object들이 가지고 있는 Attribute의 Type이 서로 일치하지 않았을 때에 나타남으로써 다음과 같이 Clean Node를 통해 고쳐볼 수 있다.
A Mis-match of Attibutes
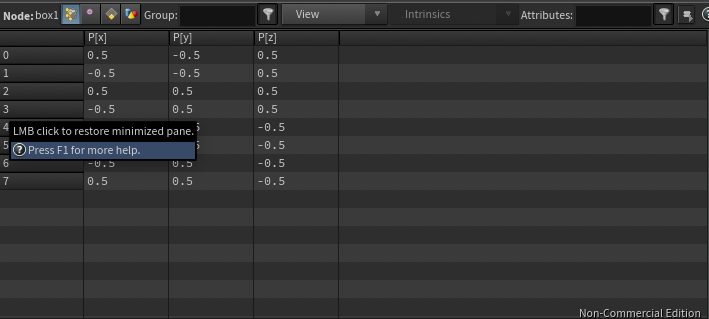
Box Object에는 Point Attribute의 정보들만 담고 있는 상태이고 Normal Attribute의 대한 정보를 담지 않고 있다.
Rubbertoy Object에는 Point Attribute와 함께 Normal Attribute의 대한 정보도 담고 있다.
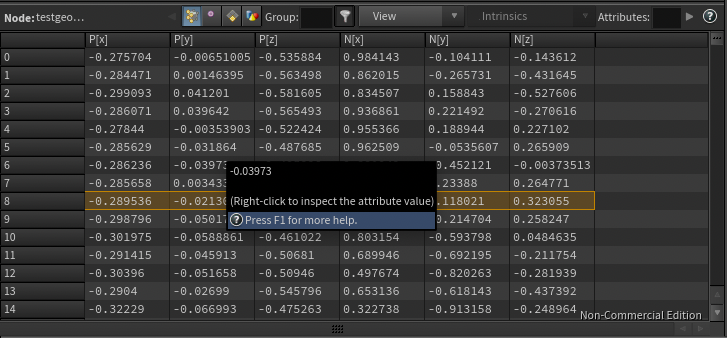
이러한 상황에서 두 각기 다른 Object들을 Merge Node로 연결하였을 시에 다음과 같이 경고등이 뜸과 동시에 Geometry Spreadsheet에서 Box의 Normal Attribute를 계산하여 0번부터 7번까지의 Point들의 Position과 Normal값들을 제시한것을 알 수 있다.
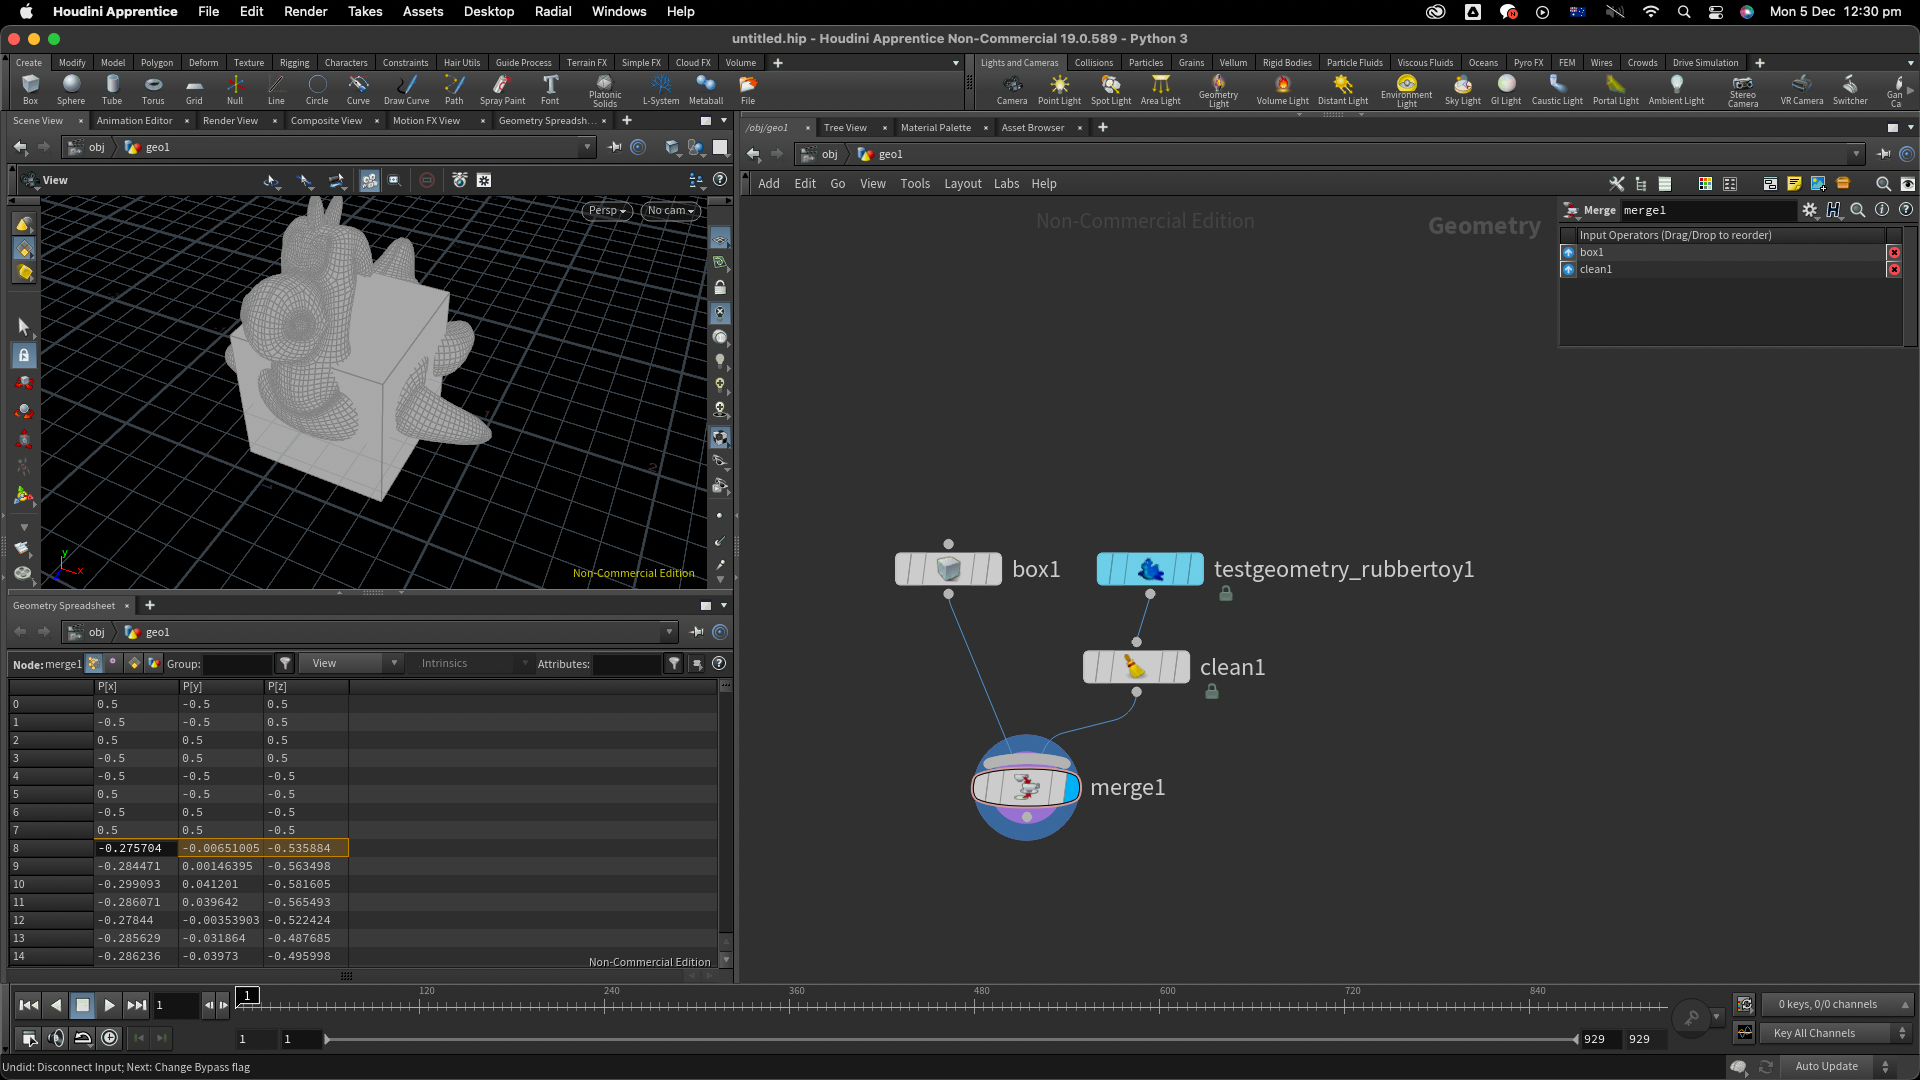
이 때 Clean Node를 활용하여 Rubbertoy에 있는 Normal Attribute를 없애주면 각기 내포하고 있는 Attribute들은 Position만 있게 되어 경고등이 더이상 뜨지 않고 Geometry Spreadsheet에서는 Position의 정보들만 디스플레이 하게 된다.
Animation in Houdini
그렇다면 Object에 Animation을 구현하는 방법들은 무엇들이 있을까? 크게 세 가지 방법들이 있다.
- 특정 Frame에 Option + Parameter Value 값을 좌클릭 하여 Keyframe을 생성하여 Animation을 구현하는 방법.
- HScript로 파라미터를 작성하여 원하는 수식에 맞게끔 Animation을 구현하는 방법
- point() Function을 활용하여 파라미터를 작성하여 다른 Object의 Position 정보 값들을 불러와 똑같이 원하는 Animation에 적용될 수 있게끔 하는 방법. Point() Function에는 각각 다음과 같은 값들이 들어가야 한다.
point ("Surface Node", Point Number, "Attribute", index)

// Example:
point ("../MOVE", 0, "P", 0)
https://www.sidefx.com/docs/houdini/expressions/point.html
point
point("/obj/geo1/facet1", 3, "P", 0) Returns the X component of point 3 of the facet1 surface node in geo1. point("/obj/geo1/facet1", 3, "N", 2) Returns the Z component of the normal attribute of point 3 in the facet1 surface node of object geo1.
www.sidefx.com
point() Function
그렇다면 Vex 상에서 point() Function을 이용하여 각기 다른 Object들을 이루는 Point들의 거리 사이의 값을 구하고 싶으면 어떻게 하면 될까? 이는 지난 Joy of Vex에서 다루었듯이 각기 Object을 해당하는 Wrangle Node의 Input에 연결해준 다음에 각각의 값을 불러와 distance() Function을 사용하여 각 두 Vector 값 사이의 거리 길이 값을 구해주면 된다. 만약 length() Function을 사용하여 거리의 값을 만들어 주고 싶으면 두 Point들의 Vector 값의 차를 구한 다음에 그 값을 Length() Function에 넣어주어야 한다는 특징이 있다. 이는 왜냐하면 Length() Function은 원점으로부터 Vector값의 거리를 구해주기 때문에 한가지의 값만 받아들이기 때문이다.
만일 다음과 같이 Node들이 구성되어 있고 add4와 add5의 길이를 구하고 싶으면 다음과 같이 코드를 작성해주어야 한다.
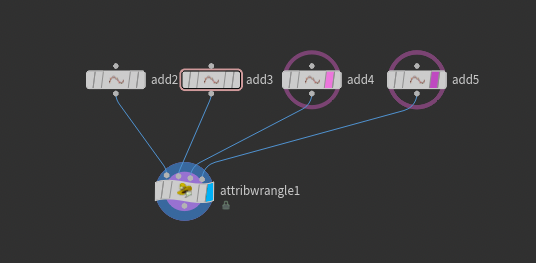
// Vex에 작성되는 point() function은 Vector 값을 반환하며 일반적인 Expression Function과는 다르게 작성된다.
point (Geometry, "Attribute", Point Number);

vector c = point (2, "P", 0);
vector d = point (3, "P", 0);

// dist() Function을 사용할 시
float dist = distance (c, d);
f@DIST = dist;

// length() Function을 사용할 시
vector sub = d - c;
float length = length (sub);
f@LENGTH = length;
https://www.sidefx.com/docs/houdini/vex/attrib_suite#point
Reading attributes
These functions take an additional argument. The functions will overwrite the integer variable you pass to this argument with 1 if the read succeeded or 0 if it failed. This lets you distinguish when the function returns 0 because the attribute value is ac
www.sidefx.com
Clamp() Function
clamp() Function과 fit() Function을 다시 상기시켜 보자면 clamp()는 말 그대로 한계 지점을 정하여 Function 안에 들어가는 값을 넘어가는 Point들의 정보들이 있을 경우 더이상 넘어가지 못하게끔 한계 지점을 만들어주는 Function 이다.
@P.y = @P.x;
@P.y = clamp (@P.y, chf("MIN"), chf("MAX"));

https://www.sidefx.com/docs/houdini/vex/functions/clamp.html
clamp
vector4 clamp(vector4 value, vector4 min, vector4 max) Returns a new vector containing the clamped value of each component.
www.sidefx.com
Fit() Function
fit()은 clamp()로 정해진 한계 지점이 포함된 상태에서 최솟값과 최댓값을 설정해줌으로써 값들을 최솟값과 최댓값 사이에 맞게끔 확대 혹은 축소시켜주는 Function이다. fit()의 두번째와 세번째로 들어가는 값들은 clamp()와 동일하다.
@P.y = @P.x;
@P.y = fit (@P.y, chf("INPUTMIN"), chf("INPUTMAX"), chf("OUTPUTMIN"), chf("OUTPUTMAX"));
https://www.sidefx.com/docs/houdini/vex/functions/fit.html
fit
fit( value, omin, omax, nmin, nmax) Takes the value in the range (omin, omax) and shifts it to the corresponding value in the new range (nmin, nmax). The function clamps the given value the range (omin, omax) before fitting, so the resulting value will be
www.sidefx.com
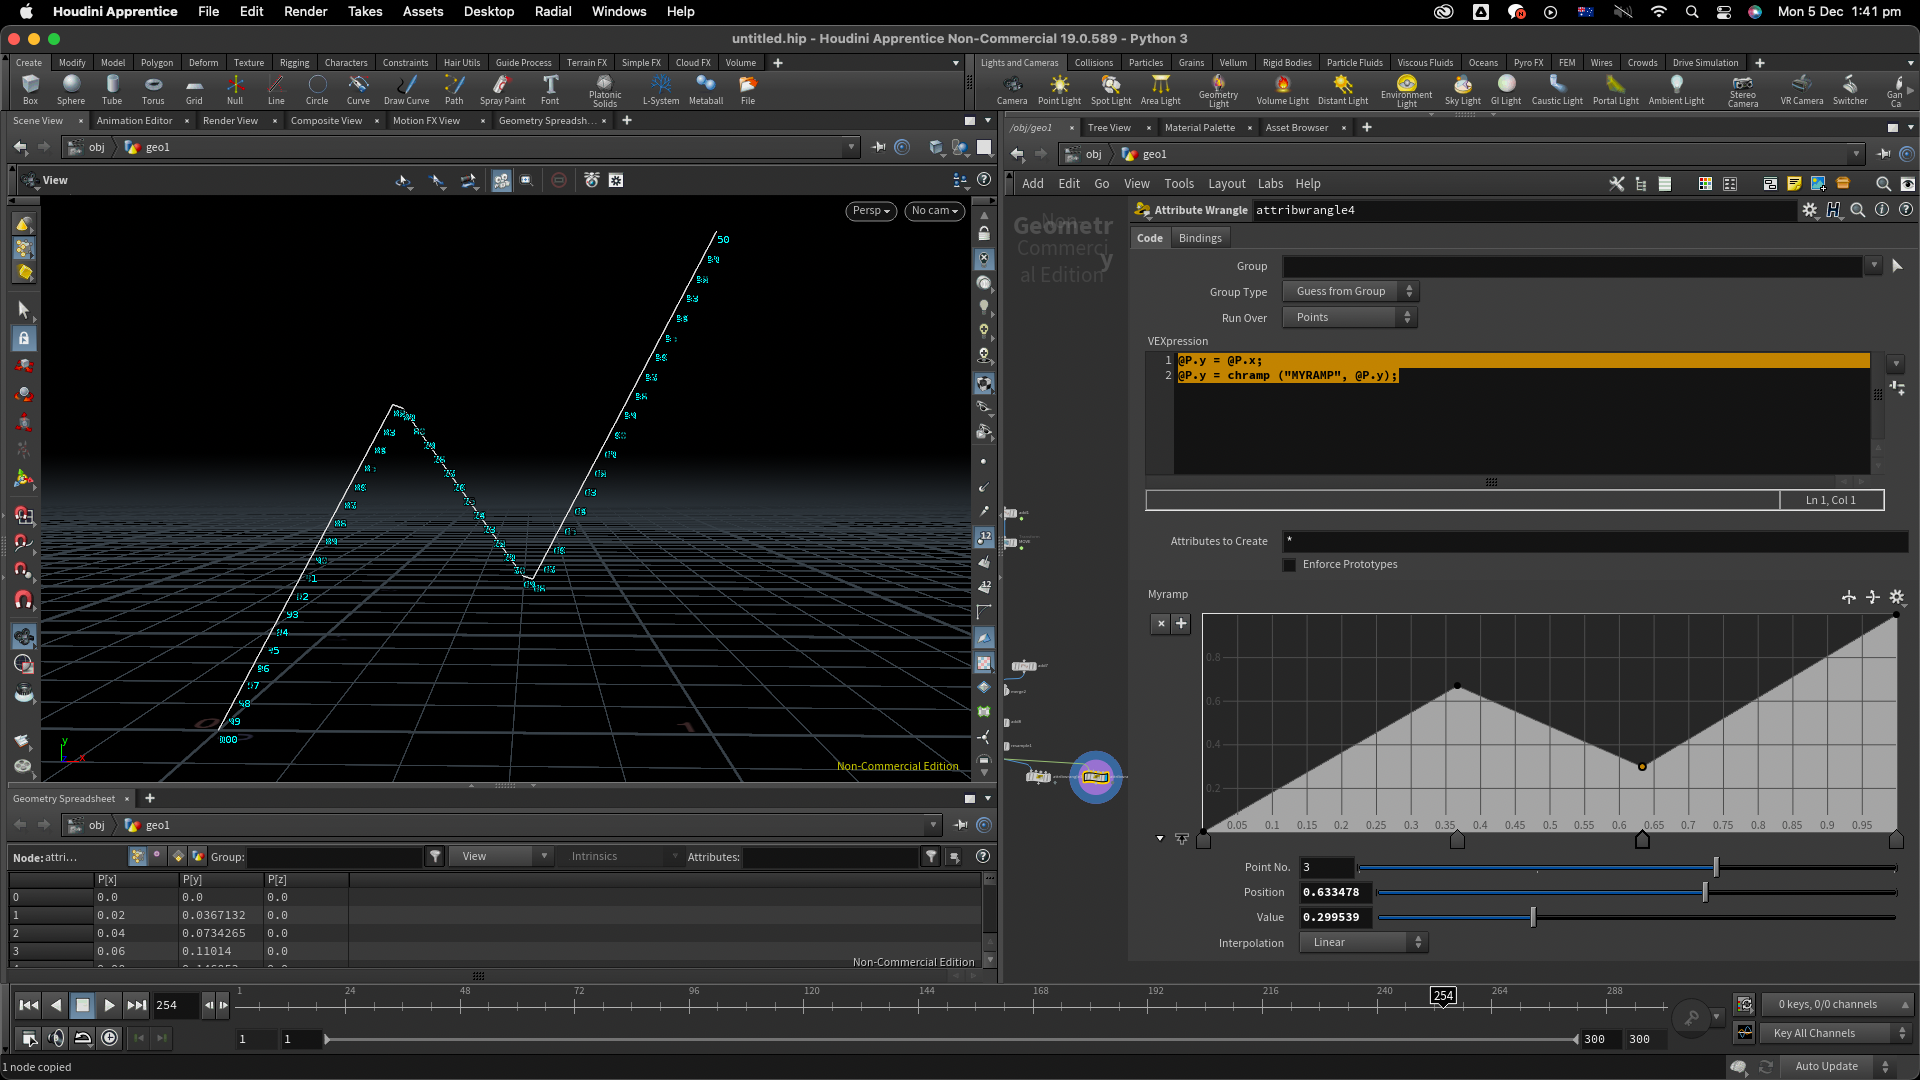
chramp() Function
chramp() Function은 각각의 Point의 값을 원하는 대로 Ramp로써 파라미터 안에서 설정할 수 있게끔 만들어주는 Function으로써 Range가 1일때 까지의 범위에게만 적용되고 그 이상 넘어가는 Object들은 Ramp의 형태가 반복되게 된다.
@P.y = @P.x;
@P.y = chramp ("MYRAMP", @P.y);
https://www.sidefx.com/docs/houdini/vex/functions/chramp.html
chramp
float chramp(string channel, float ramppos) float chramp(string channel, float ramppos, float time) vector chramp(string channel, float ramppos) vector chramp(string channel, float ramppos, float time) Evaluates a ramp parameter and retur
www.sidefx.com
If Statement
그리고 If Statement에 대해서도 상기해보았는데 이는 다음과 같은 원리로 작동되는 것을 알 수 있다. 만일 어떠한 Point들을 각기 다른 색으로 만들어 주고 싶을때 If Statement를 통해 간단하게 구현시켜줄 수 있다. 만약 아래에서 처럼 Point의 @P.x의 값이 a보다 작으면 빨간색, 혹은 a보다 크지만 b보다 작으면 초록색, 전부 다 해당하지 않는다면 파란색 이러한 식으로 If Statement를 구성할 수 있다.
float a = chf ("A");
float b = chf ("B");

if (@P.x < a) {
    @Cd = {1, 0, 0};
} else if (@P.x > a && @P.x < b) {
    @Cd = {0, 1, 0};
} else {
    @Cd = {0, 0, 1};
}
https://www.sidefx.com/docs/houdini/expressions/if.html
if
When the current frame number ($F) is less than 12, returns the current frame number, otherwise returns 75.
www.sidefx.com
normalize() Function
그리고 마지막으로 Joy of Vex에서 배웠던 심화 과정들을 빠르게 훑어보는 시간을 가져보았다.
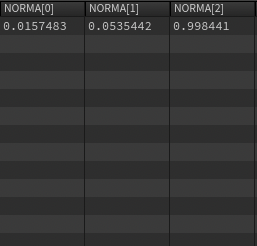
normalize() Function은 어떤 Vector값이든지 간에 Vector값의 크기를 1로 만들어주는 Function이다. 값으로는 크기를 1로 만들어주려는 Vector값을 집어넣는다.
// Example
vector a = {10, 34, 634};
vector normA = normalize (a);
v@NORMA = normA;
https://www.sidefx.com/docs/houdini/vex/functions/normalize.html
normalize
normalize( v) Returns the normalized version of v.
www.sidefx.com
minpos() Function
minpos() Function은 두 Object들이 하나의 Wrangle Node로 연결되었을시에 기준이 되는 Object에서로부터 Reference가 되는 Object 정보중 가장 가까운 Point의 Vector값을 반환해주는 Function이다. 값으로는 반환하려는 Reference가 되는 Object이 Wrangle Node의 어떤 Input에 연결되었는지에 대한 번호값과, 불러올 Point들의 Attribute Type을 작성한다.
// Example

// 1번 input으로 들어간 geometry를 구성하는 포인트들 중 가장 가까운 포인트의 위치값을 좀 알려달라
vector pos = minpos (1, @P);
v@POS = pos;
https://www.sidefx.com/docs/houdini/vex/functions/minpos.html
minpos
If specified, only report points on You can also use group specification syntax like @Cd.x>0, but note that the @ may need to be escaped with a backslash in a Wrangle snippet. An empty string matches all primitives.
www.sidefx.com
nearpoint() Function
nearpoint() Function은 두 Object들이 하나의 Wrangle Node로 연결되었을시에 기준이 되는 Object에서로부터 Reference가 되는 Object 정보중 가장 가까운 Point의 Point Number (Integer)값을 반환해주는 Function이다. 값으로는 반환하려는 Reference가 되는 Object이 Wrangle Node의 어떤 Input에 연결되었는지에 대한 번호값과, 불러올 Point들의 Attribute Type을 작성한다.
// Example

// 1번 input으로 들어간 geometry를 구성하는 포인트들 중 가장 가까운 포인트의 포인트 넘버값을 좀 알려달라
int pos = nearpoint (1, @P);
i@POS = pos;
https://www.sidefx.com/docs/houdini/vex/functions/nearpoint.html
nearpoint
When running in the context of a node (such as a wrangle SOP), this argument can be an integer representing the input number (starting at 0) to read the geometry from. Alternatively, the argument can be a string specifying a geometry file (for example, a .
www.sidefx.com
dot() Function
dot() Function은 두 Vector의 값 사이의 내적 각도를 구해주는 Function이다. 값으로는 두 Vector의 값들이 들어간다.
// Example

float angle = dot (@P, @N);
f@ANGLE = angle;
https://www.sidefx.com/docs/houdini/vex/functions/dot.html
dot
int dot(int a[], int b[]) Returns the sum of dot products i.e. dot(a, b) = dot(a[0], b[0]) + ... + dot(a[n-1], b[n-1]) where n = min(len(a), len(b)).
www.sidefx.com
cross() Function
cross() Function은 두 Vector에서 수직이 되는 Vector값을 구해주는 Function이다. 값으로는 두 Vector의 값들이 들어간다.
// Example

vector vec = cross (@P, @N);
v@VEC = vec;
https://www.sidefx.com/docs/houdini/vex/functions/cross.html
cross
vector cross(vector a, vector b) Returns the cross product between the two vectors.
www.sidefx.com
Array & nearpoints() Function
Array는 여러개의 정보들을 하나의 Variable로써 만들어주는 역할을 해주며 nearpoints() Function과 같이 nearpoint()와 동일하지만 여러개의 Reference Object에서 가장 가까운 Point들의 Integer 정보들을 반환하는데 array의 형태로써 하나의 Variable안에 저장될 수 있다. nearpoints() Function은 값으로는 반환하려는 Reference가 되는 Object이 Wrangle Node의 어떤 Input에 연결되었는지에 대한 번호값과, 불러올 Point들의 Attribute Type을 작성하고, 얼마만큼의 범위만큼 가까운 Point들을 찾을지에 대한 Float 값과, 얼마나 많은 Point들의 정보들을 불러올지에 대한 Integer값을 입력한다.
// Example

// 1번 input으로 들어간 geometry를 구성하는 포인트들 중 3.5만큼의 범위 안에서 가장 가까운 10개의 포인트들의 포인트 넘버값을 좀 알려달라
int[]pos = nearpoints (1, @P, 3.5, 10);
i[]@POS = pos;
https://www.sidefx.com/docs/houdini/vex/functions/nearpoints.html
nearpoints
The name of the geometry file to reference. Inside Houdini, this may be “op:full_path_to_sop” to reference a SOP.
www.sidefx.com
Loops - foreach & for
Loops는 각각 두가지의 형태가 있는데 foreach는 array안에 값들을 전부 열거해주는 Loops로써 값으로는 반환을 하려는 variable값과 array variable을 집어넣어주면 된다.
 // 이 값을 가지고 있는 array variable twa생성
int twa[] = {2, 7, 3, -2, 8};

foreach (int x; twa) { // array twa안에 있는 모든값들에 대해
    addpoint (0, set (x, 0, 0)); // array안에 있는 각각의 수치에 따라 생성되는 포인트들의 x값이 정해진다
}

https://www.sidefx.com/docs/houdini/vex/functions/foreach.html
foreach
foreach ([element_type] value; array) { } This loops over the members of array. For each iteration, it copies the current member to value and then executes statement. For example: int an_array[] = {1, 2} foreach (int num; an_array) { printf("%d", num); }
www.sidefx.com
for Loops는 Array 안에서 원하는 범위의 값들을 전부 인식하게끔 만들어주는 Loops로써 값으로는 Variable, Conditional, 그리고 Calculation이 들어간다. 즉 예시를 들면 다음과 같다.
 // 이 값을 가지고 있는 array variable twa생성
int twa[] = {2, 7, 3, -2, 8};

for (int i = 0; i < len(twa); i++) { // i가 0일 때부터 array안에서의 값들의 수만큼 까지 1씩 늘어났을때
    addpoint (0, set(i, 0, 0)); // x값이 i일 경우의 포인트들을 모두 생성하여 보여주어라
}
CopyToPoints Node
CopyToPoints Node는 첫번째 Input에 복사하고자 하는 Object을 연결해준 다음 두번째 Input에 어떤 Point들에게 복붙하려는지 설정해줄 수 있게 할 수 있다. 이 때 두번째 Input에 연결하기전에 Wrangle Node를 달아두어 @N과 @up (바라보는 방향과 머리가 들려있는 방향을 정해주는 Attribute)혹은 @pscale (Object이 얼마나 확대되거나 축소될지 정해주는 Attribute)과 같은 Attribute를 세부적으로 설정하여 원하는 Rotation혹은 Scale으로 해당 Object이 각각의 Point에서 바라보게끔 만들어 주었다.
https://www.sidefx.com/docs/houdini/nodes/sop/copytopoints
Copy to Points
www.sidefx.com
quaternion() Function
Quaternion() Function 은 어떠한 Axis를 중심으로 얼마만큼의 Angle로 돌려줄지 결정해주는 Function으로써 @orient값을 반환하여 준다. 값으로는 3x3 Matrix의 형태인 Rotation (matrix3) 값을 집어넣을 수 도 있고, 또는 기본적으로 Radians로 단위가 설정된 Angle (float)값과 Axis (vector)값을 집어넣어 줄 수 있다. 또는 Radians의 단위인 Angle값과 Normalized된 Axis값을 곱하여 한가지의 Angleaxis (vector)값을 집어넣어줄 수 있다.
// Example
float angle = radians (chf ("ANGLE"));
vector axis = chv ("AXIS");
@orient = quaternion (angle, axis);
https://www.sidefx.com/docs/houdini/vex/functions/quaternion
quaternion
vector4 quaternion(matrix3 rotations) Creates a vector4 representing a quaternion from a 3×3 rotational matrix. vector4 quaternion(float angle, vector axis) Creates a vector4 representing a quaternion from an angle and axis. The angle is specified
www.sidefx.com
여기서부턴 Joy of Vex 내에서도 심화과정에 속하는 내용인지라 예시와 더욱 깊은 설명을 위해서 전에 작성하였던 링크를 대신해서 달아두기로 하였다.
primuv() Function & xyzdist() Function
primuv() Function는 원하는 특정 primitive에서 primitive의 u값과 v값을 토대로 원하는 정보를 받아와주는 Function이다. primuv()에는 wrangle노드에 연결된 input의 넘버, 어떠한 정보를 불러오고자 하는지, 몇번 primitive, 그리고 uv를 vector값으로 입력해주어야 한다.
https://www.sidefx.com/docs/houdini/vex/functions/primuv.html
primuv
The name of the attribute to read. For point and vertex attributes, the value will at the given UV coordinates will be interpolated from the surrounding points/vertices.
www.sidefx.com
xyzdist() Function는 minpos()/nearpoint()/nearpoints() 와 비슷하게 하나의 geometry에서 가장 가까운 geometry의 대한 정보를 가져다 주는데 세개의 정보를 가져다 준다. 이는 float값인 두 geometry의 사이의 거리값, 그리고 가장 가까운 프리미티브가 몇번인지 (integer value), 그리고 가장 가까운 부분의 uv값이 어떤 값인지 vector값으로 가져와 준다. 이때 xyzdist()에는 네개의 값을 입력해주는데 wrangle의 몇번 인풋에 연결되었는지, 어떤 Attribute정보를 불러오고 싶은지, 어떤 프리미티브 값을 불러오고 싶은지, 그리고 uv값을 뭘 불러오고 싶인지 입력해야 한다.
https://www.sidefx.com/docs/houdini/vex/functions/xyzdist.html
xyzdist
The name of a primitive group or a pattern to generate a primitive group. Uses the same semantics as a SOP group, so empty strings will match all primitives. Attribute groups like @Cd.x>0 can also be used, but note that the @ may need to be escaped with a
www.sidefx.com
primuv()와 xyzdist()의 대한 예시들과 더욱 자세한 설명들은 아래의 링크를 통해 알아볼 수 있다.
https://davidhoudinistudy.tistory.com/30
Joy of Vex - Day 19: primuv, xyzdist
중요했던 부분: - uv uv는 primitive상에서 가로값과 세로값을 1로써 비율을 맞추었을때 그 비율을 알려준다. 아래의 그림을 하나의 프리미티브라고 가정하고 가로값을 v 세로값을 u이라고 가정했을
davidhoudinistudy.tistory.com
Pointclouds
pointclouds는 각각의 위치에 해당하는 Point들의 형태를 부분 부분적을 표현하여 마치 구름이 있는 것처럼 3D의 형태를 만들어주는 집합체이다. 이 또한 여러개의 Function들과 심화적인 내용들을 포괄함으로써 다음 링크를 통해 해당 내용을 대변하도록 하였다.
https://davidhoudinistudy.tistory.com/31
Joy of Vex - Day 20: pointclouds, further learning
중요했던 부분: - nearpoints() & foreach 복습 우선적으로 nearpoints()와 foreach를 활용하여 pointclounds와 같은 형상을 만들어 보았다. 이는 box안에서의 랜덤한 위치의 7개의 점들로부터 box안을 꽉꽉이루는
davidhoudinistudy.tistory.com
Conclusion
지금까지 최초 입문 강의와 Joy of Vex의 간략한 복습들을 진행하였다. 오랜만에 다시 시작해보는 후디니 과정이었지만 다행히 지난번에 필기를 열심히 한 덕분인지 전부 다 확실하게 넘겨 집고갈 수 있었던 것 같았다. 다음 시간부터 본격적인 Houdini 1을 배워볼 예정으로써 지금까지의 내용을 확실하게 숙지해야 할 것 같다. 앞으로 배울 Houdini 1 Starter 과정을 더욱 나아감으로써 후디니에 대한 자신감을 더욱 상승시켰으면 하는 바람이다.
'FX > Houdini_Houdini 1' 카테고리의 다른 글
| Starter - Ep 1: Group (0) | 2022.12.06 |
|---|